
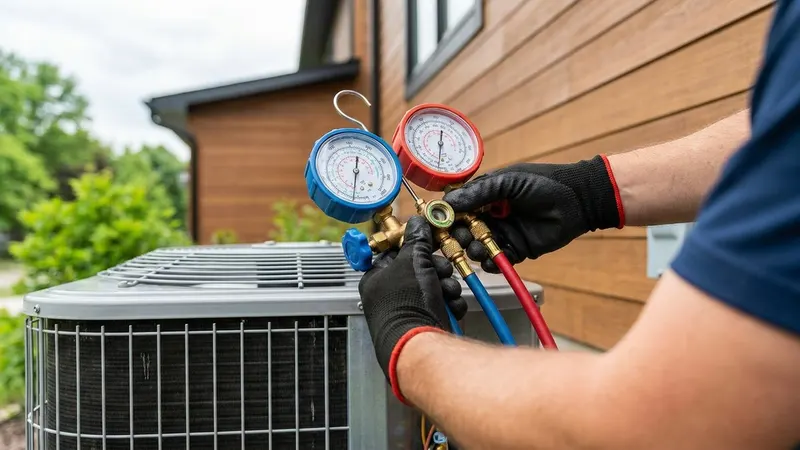
Let’s talk about HVAC gauges, the unsung heroes of heating and cooling systems. As an HVAC technician, I’ve used these tools countless times to diagnose and fix problems.
HVAC gauges measure pressure in refrigeration systems, helping us understand how well your air conditioner or heat pump is working.
These gauges aren’t just fancy pressure readers. They’re like a doctor’s stethoscope for your HVAC system. I use them to check refrigerant levels, spot leaks, and make sure everything’s running smoothly. Without these gauges, I’d be working blind.
Whether you’re a DIY enthusiast or just curious about how your AC works, knowing the basics of HVAC gauges can be super helpful. They’re the key to understanding what’s going on inside those mysterious pipes and coils. Let’s dive into how these handy tools work and why they’re so important for keeping your home comfortable.
Basics of HVAC Gauges
I’ve used HVAC gauges countless times in my career, and let me tell you, they’re essential tools for any technician. These gauges help us measure and monitor the pressure in air conditioning and refrigeration systems. Let’s break down the key things you need to know.
Types of HVAC Gauges
There are two main types of HVAC gauges I work with: analog and digital. Analog gauges have been around forever and use a needle to show pressure readings. They’re reliable and don’t need batteries, which is great when I’m on a job site all day.
Digital gauges are the new kids on the block. They give precise digital readings and can even calculate superheat and subcooling. I love using these for more complex diagnostics.
Both types come as part of a manifold set, which includes gauges, hoses, and valves all in one package. It’s like my trusty Swiss Army knife for HVAC work.
Understanding Gauge Components
The heart of any HVAC gauge set is the pressure gauges. You’ll typically see two:
- A low-pressure gauge (blue)
- A high-pressure gauge (red)
The low-pressure gauge measures the suction line, while the high-pressure gauge checks the liquid line. Each gauge has a dial face with different scales for various refrigerants.
The manifold body connects these gauges and has ports for attaching hoses. It’s got valves to control refrigerant flow - super important for tasks like system charging or recovery.
Interpreting Pressure Readings
Reading these gauges is where the rubber meets the road in HVAC work. The outer scale shows pressure in PSI (pounds per square inch). Inner scales display corresponding temperatures for different refrigerants.
Here’s a pro tip: always “zero” your gauges before connecting them to a system. This ensures accurate readings.
When I hook up my gauges, I’m looking at two key things:
- Suction pressure (low side)
- Head pressure (high side)
These readings tell me if the system’s running smoothly or if there’s trouble brewing. Too high or too low, and I know we’ve got work to do. It’s like taking the pulse of the HVAC system - it tells me everything I need to know about its health.
The Manifold Gauge Set
I’ve been working with HVAC systems for years, and let me tell you, a good manifold gauge set is like gold. It’s the key to diagnosing and fixing all sorts of cooling and heating issues. Let’s break down what makes these gauges tick.
Parts of a Manifold Gauge Set
When I open up my trusty toolbox, the manifold gauge set is always front and center. It’s got two pressure gauges - one red and one blue. The red gauge handles high pressure, while the blue one’s for low pressure.
In between, there’s a manifold block with valves. These valves are crucial for controlling refrigerant flow. I’ve got three hoses too - red, blue, and yellow. They connect the gauges to the AC system.
The whole setup lets me measure pressures and temperatures in the system. It’s like having x-ray vision for your air conditioner!
How to Read a Manifold Gauge
Reading these gauges is an art form, I tell ya. The outer ring shows pressure in PSI or Bar. Inside, you’ll find temperature scales for different refrigerants.
When I hook up my gauges, I’m looking at two things:
- Static pressure (system off)
- Dynamic pressure (system running)
The difference between these readings tells me a lot about how the system’s performing. I always make sure to zero out my gauges before each use for accurate readings.
Remember, different refrigerants have different pressure-temperature relationships. That’s why I’ve got multiple scales on my gauges. It’s all about matching the right scale to the refrigerant you’re working with.
Operating HVAC Gauges
I’ve used HVAC gauges countless times, and let me tell you, they’re essential for keeping heating and cooling systems running smoothly. These handy tools help me measure pressures, check refrigerant levels, and spot problems before they become major headaches.
Connecting to the HVAC System
First things first, I always make sure to connect my gauges properly. I attach the low-pressure hose to the suction line and the high-pressure hose to the liquid line. It’s crucial to get this right - mixing them up could give me bad readings or even damage the system.
I double-check that all connections are tight and secure. Leaks are a big no-no and can throw off my measurements. Once everything’s hooked up, I open the valves on my gauge set. This lets the refrigerant pressure reach the gauges.
Measuring Pressure Levels
Now comes the fun part - taking readings. I watch the low side and high side pressure gauges closely. The low side usually sits between 20-30 psi for most residential systems, while the high side can range from 150-250 psi.
I always compare these numbers to the manufacturer’s specs. If they’re off, it could mean:
- Low refrigerant charge
- Compressor issues
- Blockages in the system
I’ve seen my fair share of wonky readings, and they’re often the first clue that something’s not right.
Assessing System Performance
With my pressure readings in hand, I can start figuring out how well the system’s performing. I look at the difference between the high and low side pressures. This tells me a lot about the compressor’s health and overall system efficiency.
I also check the refrigerant temperature using the pressure-temperature relationship. If it’s too high or low, I know there might be issues with the refrigerant charge.
By combining these measurements with other observations - like unusual noises or poor cooling - I can diagnose most HVAC problems quickly and accurately. It’s all about putting the pieces together and using my experience to interpret what the gauges are telling me.
Refrigerants and Their Impact
Refrigerants are the lifeblood of HVAC systems, but they’re not all created equal. I’ve seen firsthand how different types can impact both performance and the environment. Let’s dig into the nitty-gritty of these cooling champions.
Common Refrigerant Types
In my years on the job, I’ve worked with a variety of refrigerants. R-22, once the go-to choice, is being phased out due to its ozone-depleting properties. R-410A has become a popular replacement, offering better energy efficiency.
R-134a is another common type I often encounter, especially in automotive AC systems. It’s got a lower environmental impact than R-22, but it’s not perfect.
Here’s a quick breakdown of these refrigerants:
- R-22: Older, ozone-depleting
- R-410A: Higher pressure, more efficient
- R-134a: Common in car ACs, lower impact
Environmental Considerations
I can’t stress enough how important it is to consider the environmental impact of refrigerants. The Global Warming Potential (GWP) is a key factor I always keep in mind when working with these substances.
R-410A, while better than R-22, still has a high GWP. That’s why I’m seeing a shift towards even newer refrigerants with lower GWP values. It’s all about finding that sweet spot between cooling efficiency and environmental responsibility.
I always make sure to handle refrigerants properly. Leaks aren’t just bad for system performance - they’re harmful to our planet. It’s our job to keep these chemicals contained and use them wisely.
Troubleshooting with HVAC Gauges
I’ve seen my fair share of HVAC issues, and let me tell you, those gauges are worth their weight in gold when it comes to troubleshooting. They’re like a doctor’s stethoscope for your AC system, helping us pinpoint problems and get things running smoothly again.
Common Pressure Reading Issues
When I hook up my gauges, I’m looking for telltale signs in those pressure readings. If the low side’s reading too high, we might be dealing with a compressor valve problem or an overcharge. On the flip side, if it’s reading too low, there could be a refrigerant leak or a clogged filter drier.
High side pressures can be just as revealing. Too high? I’m thinking condenser issues or maybe non-condensables in the system. Too low? Could be a bad compressor or a refrigerant undercharge.
Leaks and Recovery
Leak detection is a crucial part of my job. I’ll use my gauges to identify pressure drops that might indicate a leak. Once I suspect a leak, I’ll break out my electronic leak detector or even use good old-fashioned bubble solution to pinpoint it.
For recovery, those gauges are my best friends. They help me monitor the process and ensure I’m getting all the refrigerant out safely. I always make sure to:
- Connect my gauges properly
- Open the valves slowly
- Watch the pressures drop
- Close the valves when the pressures hit zero
Remember, proper recovery isn’t just good practice - it’s the law. We’ve got to protect the environment while we’re keeping folks comfortable.